
Receiving in EAS
Receiving Fundamentals
- Not all Purchase Order (PO) Lines require receipt verification; generally, only purchase orders whose total exceed $2,500 will require receipt verification in Oracle.
- Receipt verification in Oracle authorizes payment of the associated invoice.
- Do not receive goods before the supplier delivers the goods.
- Do not receive services before the supplier submits a finalized invoice.
- When a PO line requires receipt verification the invoice is placed on hold pending receipt in Oracle and an automated email notice is sent to the Requester.
Receipt Processes
EAS Logon
Step 1. Log in to EAS and choose the GW SC Departmental User O-XXX responsibility.

Receiving Goods or Services
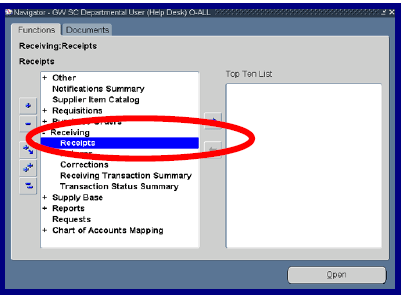
Step 2. Navigate to Receipts form by pressing the following links: Receiving > Receipts.
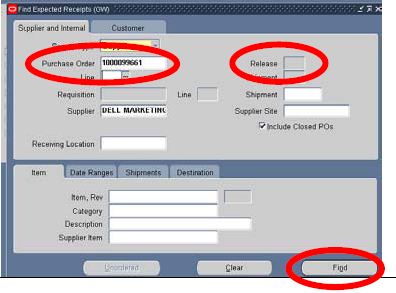
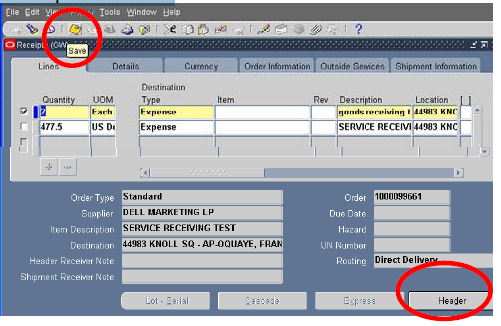
Step 3. Enter the PO number (and Release if PO is a Blanket Purchase Order), other fields are optional but recommended press the Find button. Two (2) forms will open: the “Receipt Header” and “Receipts” forms.
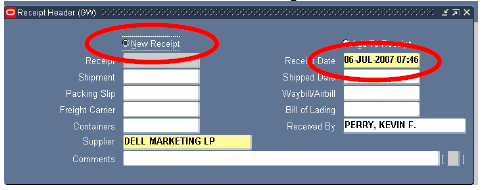
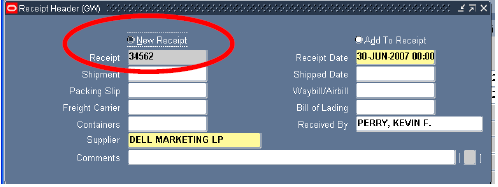
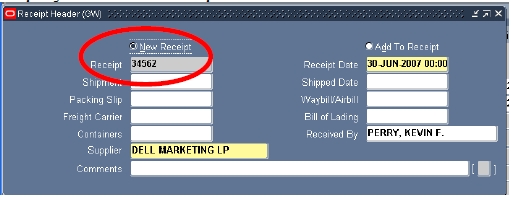
Step 4. Receipt Header: “New Receipt”, Receipt Date, your name and Supplier will load by default. Change the “Receipt Date” if appropriate. Other fields are optional. Close this form (Receipt Header) to see the Receipts form. Visit the EAS website for “Add to Receipt” how to information.
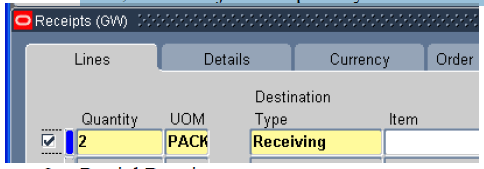
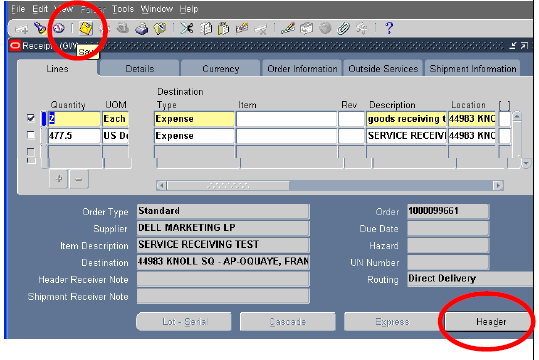
Step 5. Receipts: The PO quantity available for receipt will default into the Quantity field. Click the small white box to the left of the line to be received.
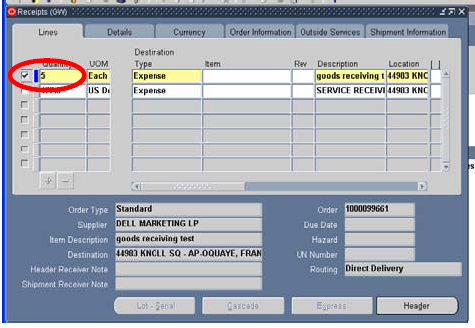
Step 6a. Goods: Enter the quantity delivered. Example: 5 ordered 2 delivered, enter 2 in the Quantity field.

Step 6b. Services: Enter dollar amount invoiced upon invoice acceptance. Example: 477.50 available for receipt but invoice is for $191.00 with the balance to be invoiced and paid in later increments.

Step 7. SAVE your work and Press the Header button at the bottom of the form to view the Receipt number. The vendor can be paid for the products and/or services received. Other fields are optional or will default with the expected value.
After the receipt is saved the Receipt number is displayed on the Receipt Header and the normal receipt is complete.
Receipts with Split Distributions
As the requestor who created the requisition you know which distributions the PO Lines are charged however review the PO to verify the distributions. Then follow Steps 1 through 5 and proceed to Step 6c.
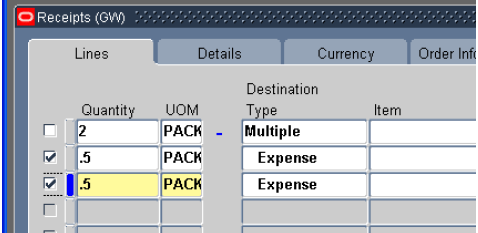
Step 6c. Split Distribution: The “Receipts” form will have a blue “+” sign between the UOM and Distribution Type fields and at the bottom of the lines tab. All other fields appear as in Step 6a & b.

1. If receive complete: To receive all available goods or services click the white box in front of the Quantity field, do not adjust the quantity. Proceed to Step 7c.
- If partial receipt only:
i) Press the blue “+” sign to view the distributions and quantities available for receipt against each distribution.

ii) Check the white box beside the line to be received. Enter the quantity received in the appropriate lines. In this instance, 2 were ordered and 1 was delivered, therefore 1 will be received. The 1 received will be split between the two distribution.
Step 7c. SAVE your work and Press the Header button at the bottom of the form to view the Receipt number. The vendor can be paid for the products and/or services received. The other fields are optional or will default with the expected value. To record additional receipts against a PO repeat Step 6c.2.
After the receipt is saved the Receipt number is displayed on the Receipt Header and the split distribution receipt is complete.
Viewing Receipts
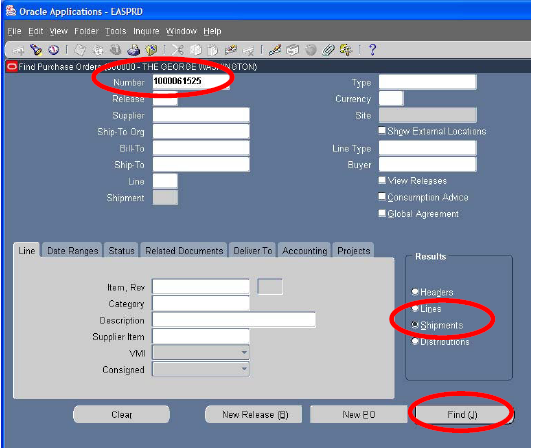
Step 1. Navigate to Purchase Order Summary, Purchase Orders > Purchase Order Summary and double click to open.
Step 2. Enter the PO in the Number field then under Results click Shipments and press Find.
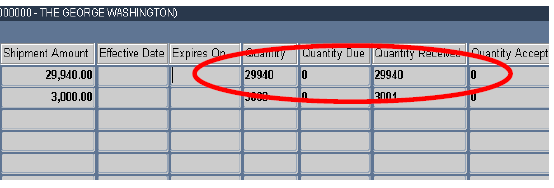
Step 3. The Purchase Order Shipments form opens and displays shipments for the PO. Scroll to the right to see Quantity, Quantity Due and Quantity Received fields. Example: Line 1 Quantity (ordered) = 29940 but Quantity Received = 29941 as a keying error. The same is true for Line 2. Correct PO receipts to prevent encumbrance issues. If you need to correct a shipment record the PO number and Release number if Blanket Purchase Order for use later. Other fields that are useful when correcting a shipment are the Line number and Shipment number.
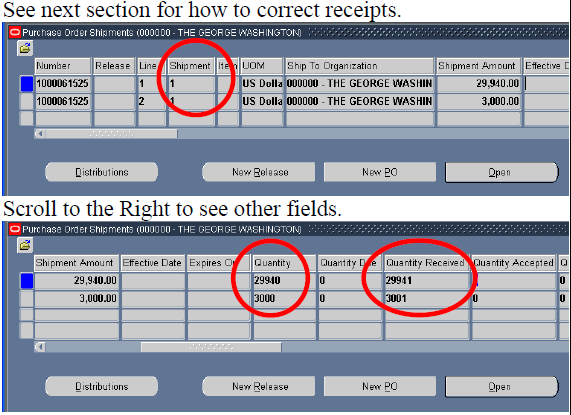
Note: Contact University Payables if the supplier has received payment because of a receipt error.
Correcting Existing Receipts
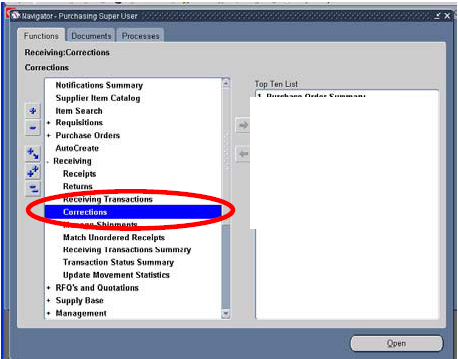
Step 1. Navigate to Receipt Corrections, Receiving > Corrections and double click.
Step 2. Two forms will open, one on top of the other. Find Corrections form with the Receiving Corrections form behind. Enter the PO, Line and Shipment numbers and press Find.

Step 3. The Receiving Correction form for this PO, Line and Shipment is displayed for analysis.
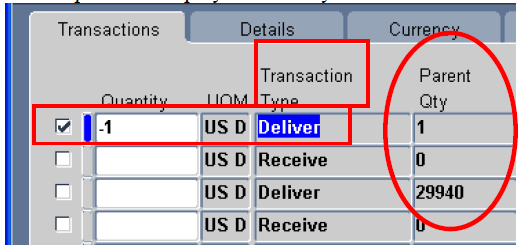
The “Parent Qty” field shows deliveries for this PO line. Two Deliveries were recorded for this shipment, quantity =1 and a quantity = 29940. Enter the quantity to be corrected as a negative number in the “Quantity” field with the “Transaction Type” of “Deliver” and press the save icon.
Step 4. Close the Receiving Corrections and Find Corrections forms.
Step 5. Reopen the Corrections forms as in Step 1.
Step 6. Repeat Step 2.
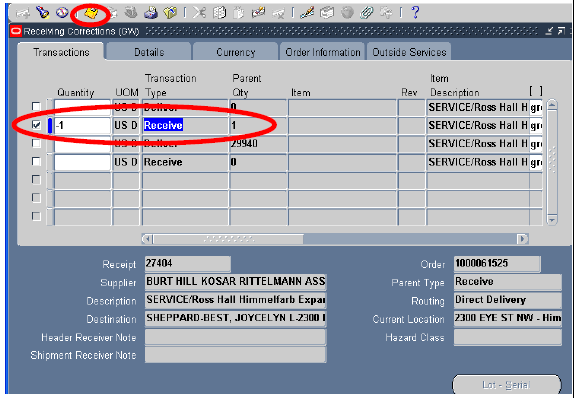
Step 7. The Quantity has now moved from Transaction Type “Deliver” to Transaction Type “Receive”. Enter the quantity to be corrected as a negative number in the Quantity field under Transaction Type of “Receive” and press the save icon.
Step 8. Close the Receiving Corrections form.
Step 9. Verify receipt correction was successful by requerying the PO shipments as outlined in View Receipts Steps 1, 2 and 3. The Quantity and Quantity Received should equal the desired numbers. In this instance, they are equal. The receipt correction is then complete.
Visit the EAS website for additional Quick Reference Guides and How To information regarding Receiving Goods and Services in Oracle Other topics covered under Training & Support, Documentation include:
- Returns to Vendor
- Performing A Receipt Inquiry
- Reviewing Receiving Transactions